Project of Fall 2022: "Attack/defense basket-ball game"
Mindstorms NXT(TM)/EV3 robots are robots made of a main unit and a set of sensors and actuators. They have been sold by Lego for several few years now, starting with the NXT version, and now with the ev3 version. Many very elaborate designs have been made using the standard kit (see for example "Mindstorms: Not just a kid's toy"). You may also watch interesting videos on youtube, such as a breakfast machine, marble conveyor, a car factory, a forklift truck, the "holononic drive", a rubik's cube solver, a printer, and a sumo game. You can also find some other nice systems on battlebricks.
The project you will work on might not be as complex as some aforementioned systems, yet it requires spending quite a lot of design and programming time on the robot and its interfaces (sensors, actuators).
Once you have received your robot box, test your robot, motors, and sensors as soon as possible! We may be able to repair/order parts with a few weeks notice, but there is very little we can do the day before the competition.
Project description
The robot you have to build shall be the winner of a basket-ball game. This section includes a description of the game and then a specification of the robot.Note that the rules might evolve during the next weeks until the final competition. I will always inform you whenever a rule evolves.
General description
The main objective of the game is to be the winner of a game with two rounds and two robots. The winner is the robot with the highest number of points. In the first round, robot #1 is the defender, and then the attacker. Robot #2 attacks first, and then defends. A round lasts 3 minutes.- Game as a defender: the robot tries to avoid the other robot to score points.
- Game as an attacker: the robot scores points by successfully shooting balls in basket.
Scoring
- Game as a defender: the defender robot gets 1 point each time at least a part of the wheel of the attacking robot enters into the exclusive area of the defender, i.e., at least a part of the wheel of the attacking robot is over the boundary line (adhesive).
- Game as an attacker: the attacker robot scores 1 point each time it successfully shoots a ball from its exclusive area. It scores 2 points when sucessfully shooting from the shared area. And it scores 3 points when successfully shooting one ball from the defender exclusive area. "Successfully" means that the ball enters the basket and remains in the basket (i.e., it does not bounce outside of the basket). To select the area of a robot, we take the one giving the most points to the robot, assuming that at least part of one of its wheel is inside (so, not on a line) of this area. Also, the attacker robot gets two points each time the defender robot has a part of one of its wheel entering into the attacker exclusive area, i.e. a part of one wheel is over the boundary line.
Stadium specification
The stadium is explained in the following picture. The overall game area is delimited by a wooden fence on the four sides (see figure below). The basket itself is specified in this document. Balls have a diameter of around 5.5cm.

Specification of the stadium
General rules
- The robot can be freely re-programmed between game rounds, but it is forbidden to remotely control your robot.
- Robots have the right to release obstacles, e.g. throwing an obstacle into the opponent's area is encouraged.
- Robot must start in their designated area.
- The attacking robot can contain up to 2 balls when starting.
Specification of the robot
- The program you run should have been totally written in C.
- The robot must be contained in width=30cm, length=30cm, height=35cm maximum at start-up.
- Robots can use up to four sensors and up to four engines. You are free to use the sensors you want to among the following ones: touch sensor, light sensor, color sensor, ultrasonic sensor (i.e., distance sensor), compass sensor, gyroscope sensor, magnetic sensor.
- The robot must contain a flag, on which the number of your group is clearly readable from at least two sides of your robot. The flag dimension is at most 10x10cm. It may also contain a logo, a drawing, and the name of the robot.
- A robot may change its shape (by deploying elements, or withdrawing them) during game phases.
- Robots can contain a camera and send data over wifi to send out a video stream. We do not provide any camera for this, you have to do this on your own, for entertainment purpose only.
- Destructive weapons are NOT allowed.
- It is forbidden to send orders -remotely or not- to your robot while it is playing: it must be fully autonomous as soon as the game starts, and until it ends. Any kind of cheating will result in a 0 grade, just like for all exams at Eurecom.
Competitions and reports
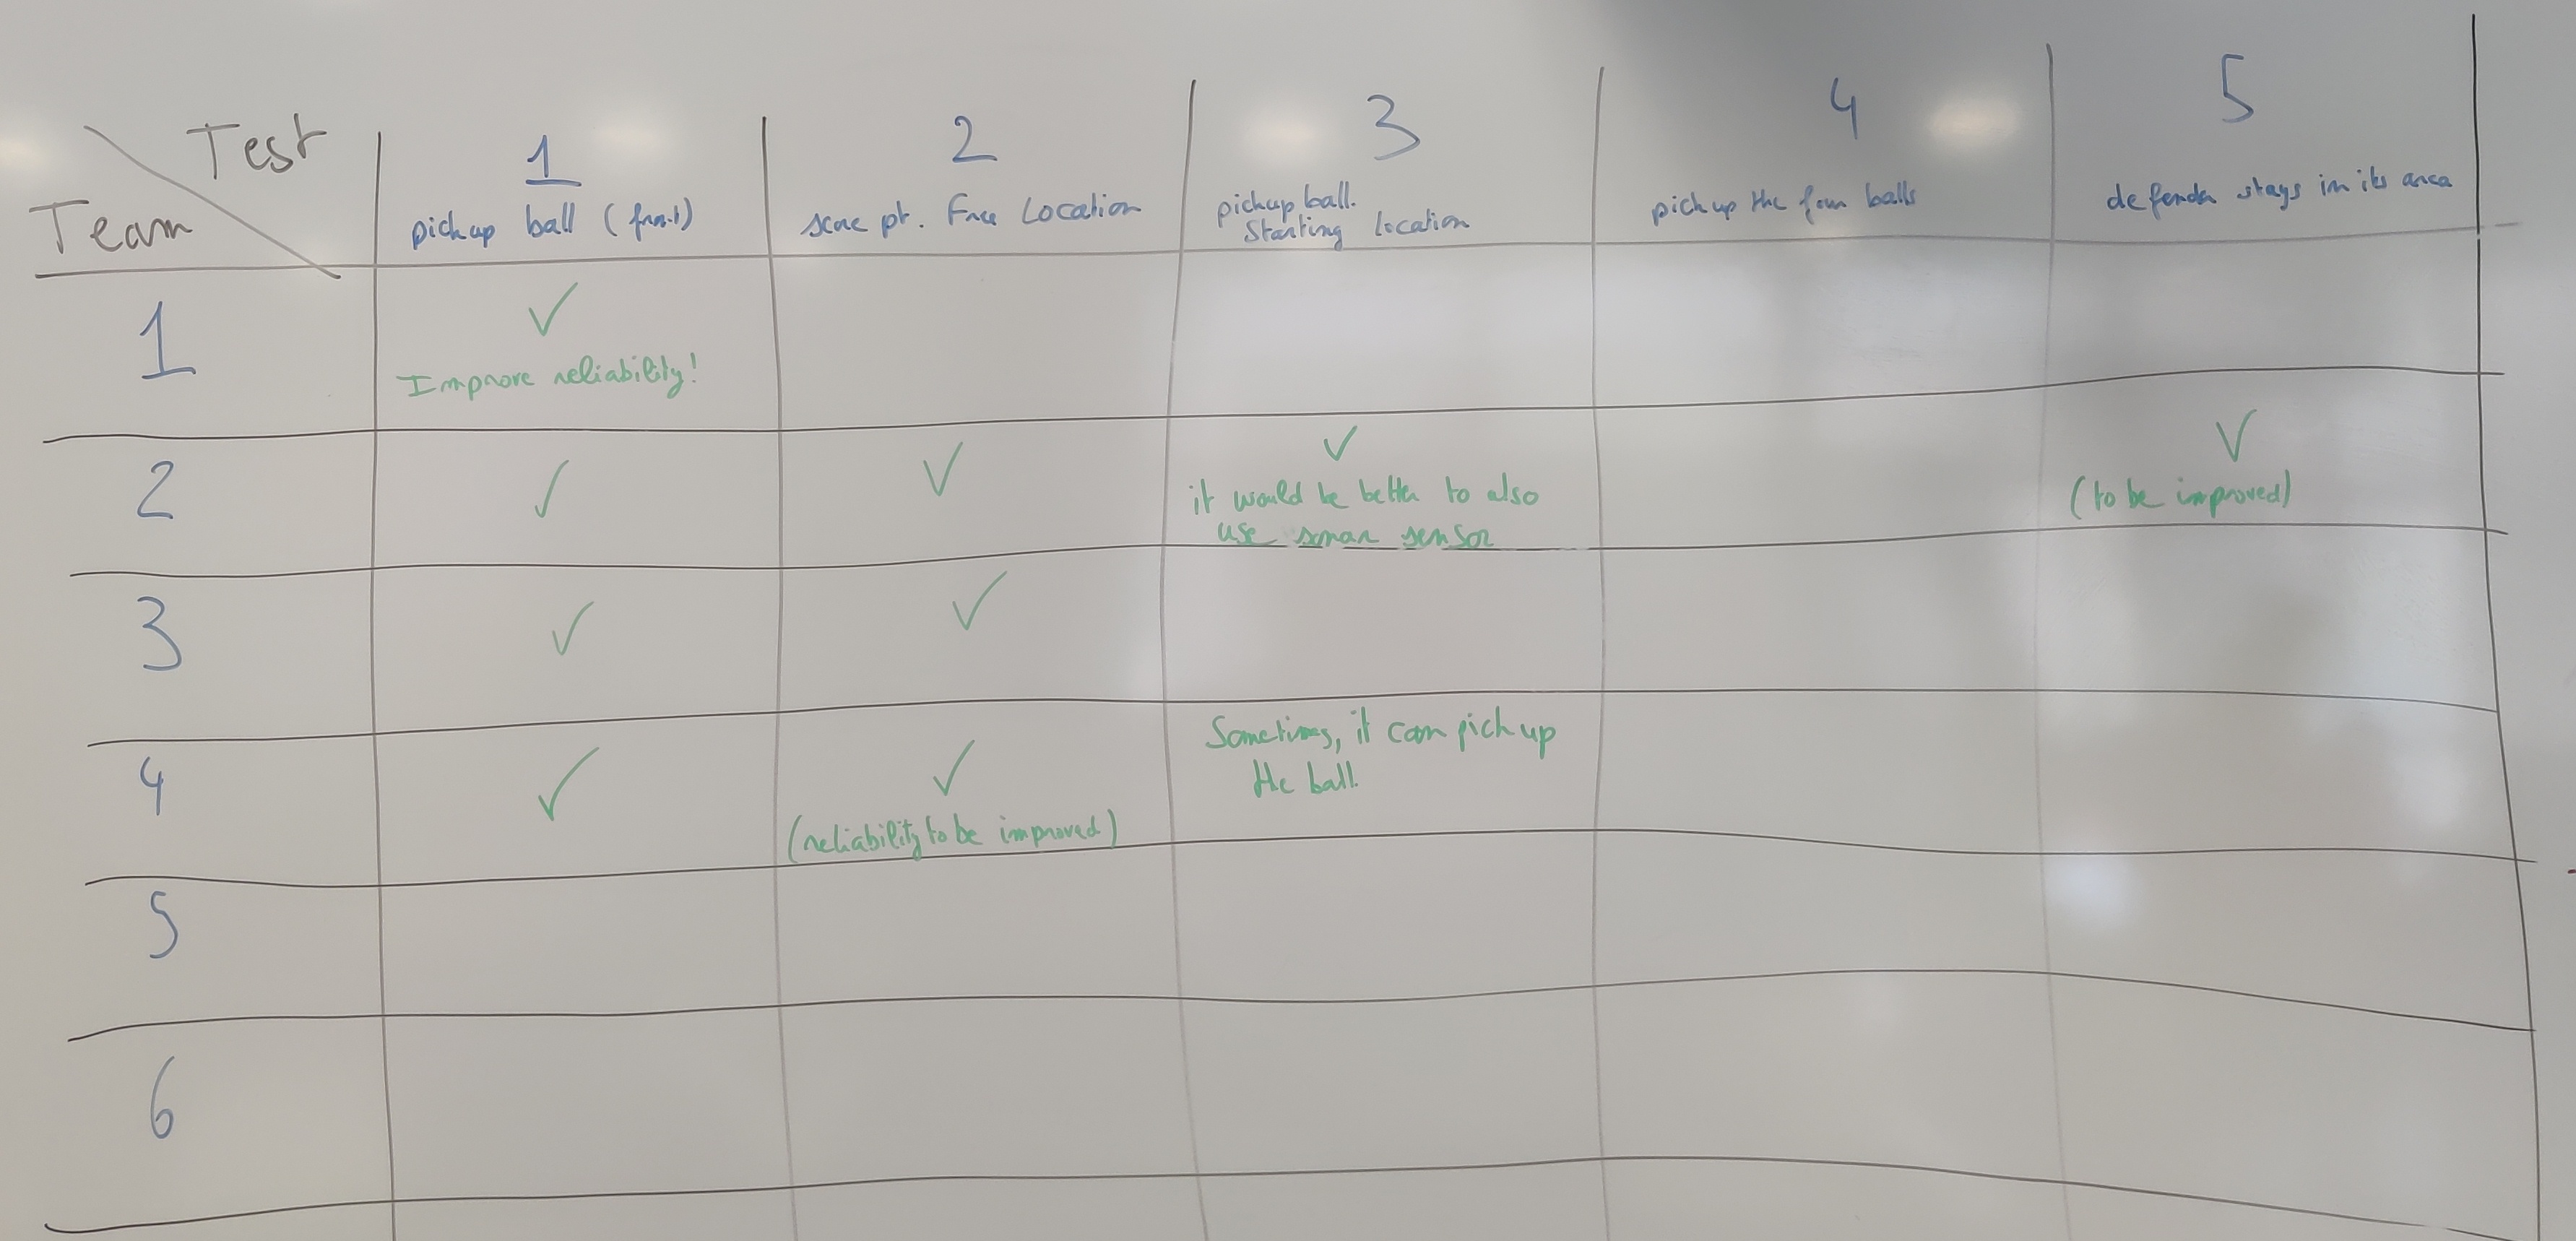
There are two "competitions", as described after. Your project grade takes into account the two competitions.- Competition #1: the 10th of January, 2023: your website should be started with at least the name of your robot (I don't expect more in the website for this deadline). The following tests will be performed in the stadium. Tests are used to test "basic" functions in order to understand how well their work. They are not taken into account for the final grade, apart if your robot fails ion the final competition. You can validate multiple tests with one execution if you wish to.
- Test #1. Be able to pick up a ball located right in front of the robot.
- Test #2. Be able to score points: your robot is placed manually in a place of your choice.
- Test #3. Be able to pick up a ball from the starting position.
- Test #4. Be able to pick up the 4 balls in a row from the starting position, and without entering into the defender's area. You don't have to hold the four balls within the robot, you can release them progressively.
- Test #5. Be able to navigate as a defender without entering the attacker's area.
- Final competition: the 31st of January, 2023: final competition. For the final competition, the website must be fully completed. Also, during the final competition, I may interview each member of the group, so as to understand the contribution of each group member.
Your report consists of a website and the source code of your robot. The website shall contain the following information:
- Description of the architecture of the robot: sensors and actuators, etc. Pictures of your robot on the web site would be appreciated.
- Algorithms used for the two most important points: strategy for the different rounds (attacker, defender). Don't provide source code here, just try to describe the algorithms using a pseudo C language. Also, do comment those algorithms, and explain why you think they are efficient.
- Source code, and instructions on how to use that source code: how to compile it, how to download it on the robot, and how to start the robot. To protect you work, you can set a password to access to the code, but make sure to give us access in order to grade it (e.g., private git repository). You could even put a fake code on your website until the very last moment ;-). I strongly advise you to rely on a versioning system (git, hg) to work on the code. Also, frequently backup your code.
- Videos / pictures of your robot in action [we may provide you with cameras and video recorders if necessary].
- How you have worked in the group, i.e., who made what. Be clear about that. Each member of groups will get an individual grade. All members of a team must contribute to the source code. You source code must clearly indicate, with comments, who programmed which function.
Grading
- Report: 5 points
- Algorithms: 5 points
- Code: 5 points
- Competition (ranking): 5 points
- Bonus, including test session and work in group: 2 points
Groups
2 groups of 3 students, 4 groups of 4 students (6 groups in total).
(The group leader is listed first. Follows name of the other students, then the name of the robot and finally the link to the website).
- Shubhika GARG, Yash AGARWALLA, Jerold Kingston GNANASEKARAN . Rhino
- Johanne DYBEVIK, Aditya YOGESH NAIR, Anatole MAURER. KOBE
- Duc Khai NGUYEN, Khairul Annuar SUHAIMI, Muhamad Ikhwan JOHARI, Huy-hung LE. SEAL
- Alberto SÁNCHEZ, Lenia MALKI, Ludovic SAHKOUN, Maryam MADANI. Lebot James
- Fanfu WEI, Qin ZHENG, Jordan ALLEMAND, Roberto SIRIGU. http://robot-os-group5.francecentral.cloudapp.azure.com/
- Yossi TAPIERO, Ali ALQETAITI, Romain BOURGEOIS. C'3POinters
How do I borrow a robot?
Please, take care not to lose parts, especially cables and sensors. Also, a microsd card and a wifi dongle comes with the robot. The procedure to borrow a robot is as follows:- Make a group of 3 students or 4 students, and decide on a group leader.
- The group leader sends me an email with the list of students of the group. List of: first_name, LAST_NAME, email. The leader shall be the first student in the list.
- I will validate the group. If the group is not validated for some reason I will provide, go back to stage 1. Otherwise, go to next step. Note that I validate groups with a First Come First Served policy (Date of email sent).
- Once I've answered your group with "validated", the group leader can go to Tom Zenatti's office (327), Tom.Zenatti AT eurecom.fr, in the IT Department. You will be granted an ev3 box. Only the group leader has the right to enter in the office of Mr Zenatti, and only during the morning or the afternoon breaks (do not go during lunch break).
Access to stadium
- The stadium is located in room 52. You are free to use it whenever you want but please do take care about the arena, especially the accessories.
ev3
For the ev3 system, the idea is to flash on the provided SD card a Debian GNU/Linux system. Then, you will be able to use the development language of your choice (C, python, etc.). But we ask you to develop in C.Installing Linux on ev3
All information to install Linux on your ev3 is given here. This page also explains how to connect to your ev3 to your PC via the usb cable, bluetooth, or wifi. I do suggest to use the Debian JESSIE version, so not the most recent version. You should find the correct version in this webpage by selecting the most recent ev3dev-jessie image.Using and programming ev3
- Connect to the EV3 by ssh If you have difficulties to connect to your robot via WIFI, BT ou USB, please contact us.
Once your robot has access to Internet, it should display its IP address in the upper left corner of its display (let's assume it is 192.168.2.2). Then, you can try to ssh to the robot (the default password is maker):
$ ssh robot@192.168.2.2The robot user is a sudoer, i.e. it can execute commands with root privileges when using the command sudo first.
Once you are logged on the robot, do verify that you really have an internet access. For instance, try to do:
$ ping www.ev3dev.org
$ sudo apt-get update&&sudo apt-get upgrade
$ sudo apt-get install gcc make
$ GIT_SSL_NO_VERIFY=true git clone https://github.com/in4lio/ev3dev-c.git
$ cd ~/ev3dev-c/source/ev3
$ make
$ sudo make install
$ GIT_SSL_NO_VERIFY=true git clone https://gitlab.eurecom.fr/ludovic.apvrille/OS_Robot_Project_Fall2020.git
$ cd OS_Robot_Project_Fall2020/client
If you are on your host computer, you then need to copy the example files to the robot:
$ scp tester.c Makefile robot@192.168.2.2:
$ make testeror
$gcc -I./ev3dev-c/source/ev3 -O2 -std=gnu99 -W -Wall -Wno-comment -c tester.c -o tester.oor $ gcc tester.o -Wall -lm -lev3dev-c -o tester or:
$ makeTo run the code:
$ ./testeror to compile and run:
$ make testernote that the code and Makefile I provide are for the version of Debian Jessie that I have installed on my robot. the code and/or Makfile may fail for your robot: in that case, try to understand the error(s) you get and accordingly adapt the Makefile or the code.
Other examples
- Sample code is also provided in the ev3c-master repository. Samples of how to control the motors and sensors are included in tester.c. The Ultrasonic Sensor is described here.
- If your compass sensor does not correctly work with the test_sensor program, we provide a code specific to the use of this sensor. Use the "i2c" target of the provided Makefile to compile the file.
- Other examples can be downloaded from the ev3dev C library here. Examples are provided in eg/tacho and eg/sensor.
- rfcomm-client.c is an example of how to communicate with the server over wifi. Compile with gcc rfcomm-client.c -o rfcomm-client.
- If you can't get your robot working, bring it along to course staff.
Cross compilation
Basic
You may want to compile your source code on your laptop, e.g. to check the syntax of your code or to speed up the compilation process. Cross-compilation for ev3 is available as an ev3 docker image. Here is what I've made to make this work on my Debian GNU/Linux computer:- I have first installed docker, created a docker group, added myself to the docker group, and started the docker service. Installing docker may require more than a simple apt-get, so please refer to the documentation of your OS, e.g. for the one for ubuntu
- Then, I have installed the ev3 docker image:
- Once done, I've created a helloworld in C:
-
$ cat > /tmp/hello.c #include
(do "CTRL D" at the end of this command).int main(int argc, const char *argv[]) { printf("OS is fantastic!!\n"); return 0; }
- I've compiled the file using the cross compiler provided within the docker image, and tested the generated file. The following command assumes that hello.c is located in /tmp on your host system (but you can place it wherever you want: update the following command accordingly). The following instructions are the one that I have used on my debian/jessie GNU/Linux PC.
$ sudo apt-get install docker-engine
$ sudo groupadd docker
$ sudo gpasswd -a ${USER} docker
$ sudo service docker start
You may have to log-out for the group modification to be effective.$ docker pull ev3dev/debian-jessie-armel-cross:latest
$ docker run -e LOCAL_USER_ID=`id -u $USER`  --rm -it -v /tmp:/src -w /src ev3dev/debian-jessie-cross
[Shell in container]$ cd src
[Shell in container]$ arm-linux-gnueabi-gcc -o hello hello.c
Then, if you want to execute the generated ARM executable, you first need to install the ARM emulation environment. Then, you can execute "hello":
$ sudo apt-get install qemu-user-static
[Shell in container]$ ./hello
OS is fantastic!!
- Tag the docker image:
- Install ev3 lib, put them in the project directory, and start the docker image:
- In the container, run the following commands:
$ docker tag ev3dev/debian-jessie-cross ev3cc
$ git clone https://github.com/in4lio/ev3dev-c
$ docker run --rm -it -h ev3 -v PATH/TO/PROJECT/:/src -w /src ev3cc /bin/bash
[Shell in container]$ cd ev3dev-c/source/ev3/&&make&&sudo make install&&make shared&&sudo make shared-installIn the Makefile for compiling your code, do not forget to substitute "gcc" with "arm-linux-gnueabi-gcc". For running your project, add "export LD_LIBRARY_PATH=~/ev3dev-c/lib" in the Makefile.
Another way to do
(Way suggested by Fredrik Flornes Ellertsen. Note: on our side, for the tester.c file, we had to put the exact location of included files such as ev3.h. And also we had to remove the lines that use 'ev3_brick_addr', which the compiler cannot understand)This has been tested on native Ubuntu 17.04 and on Windows using the Windows Subsystem for Linux.
- In an empty folder (here called robot_code/) on your computer, clone the ev3dev repository:
- Install the cross compiler (source: https://www.acmesystems.it/arm9_toolchain):
- In order to compile code that links to the ev3dev-c and/or other libraries, we need to use the robot's own versions of these libraries e.g. libev3dev-c.a. By linking statically we eliminate the need to install anything on the robot itself. Place these files in robot_code/libraries.
- Create a Makefile to simplify the compilation process. The following example Makefile expects the project to be organized like illustrated below, but will naturally depend on the group's project:
$ git clone https://github.com/in4lio/ev3dev-c
$ sudo apt-get install gcc-arm-linux-gnueabi
	robot_code/
		Makefile
		ev3dev-c/
		libraries/
			libev3dev-c.a
		include/
			movement.h
			sensors.h
		source/
			movement.c
			sensors.c
			main.c
Running 'make' in the robot_code/ directory should yield an executable called 'main' in the same directory. Using a file transfer tool like scp, copy this file to the robot and run it.
Competitions results
First tests, January the 10th, 2023
Final competition, February the 2nd, 2023
Podium
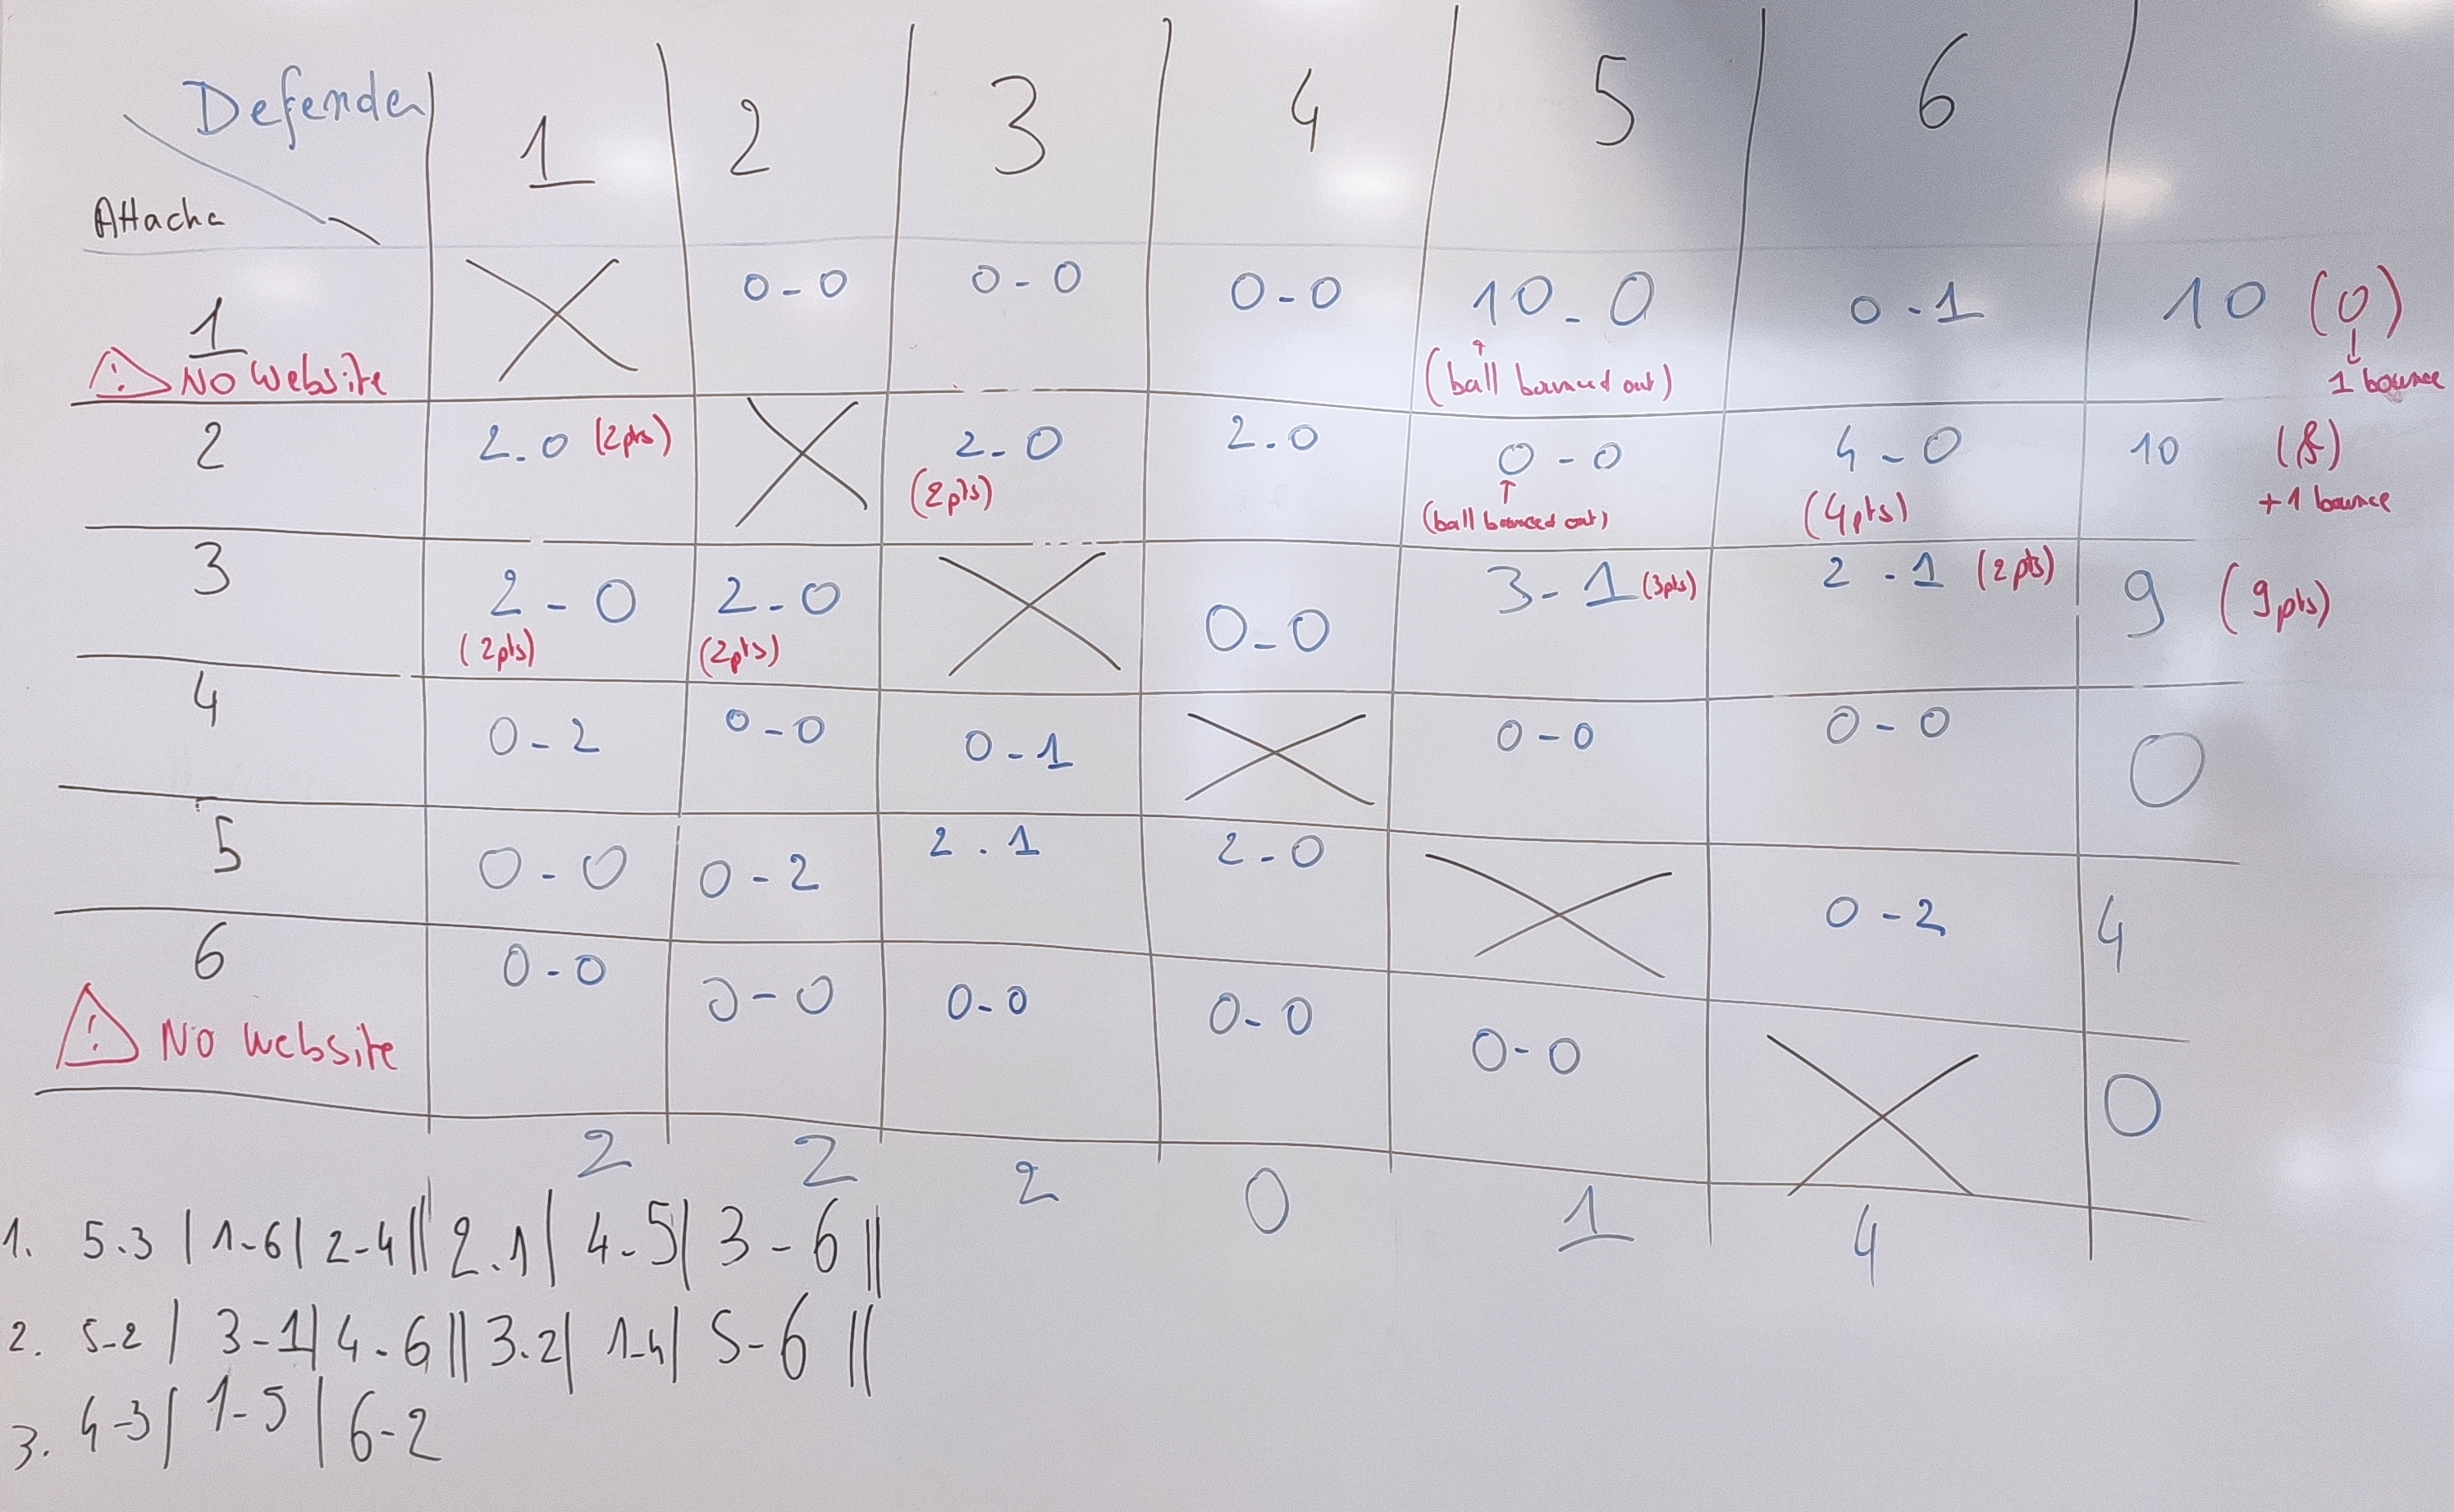
Basically, robot #3 was the best in scoring points, with robot #2 being close. Robot #1 got many points during one game because the adversary robot couldn't properly navigate. Yet, robot #1 was able to make nice shots (but ball bounced out). Robot #6 was the best defender. Overall, defending strategies were not as developed as the attacking strategies.
