Ada Tutorial - Chapter 25
DYNAMIC ALLOCATION
Although this chapter is titled "Dynamic Allocation", it may be more
proper to title it "Sorting with Linked Lists", since that is what we will
actually do. This chapter contains example programs that will illustrate
how to generate a linked list with dynamically allocated entries. It is
meant to illustrate how to put several programming techniques together
in a meaningful manner. It will also instruct you in dynamic allocation
and deallocation techniques.
DYNAMIC DEALLOCATION
One of the most important topics covered in this chapter is that of
dynamic deallocation. After variables are dynamically allocated and used,
they can be deallocated, permitting the memory space to be reclaimed for
reuse by other variables. Ada uses two techniques, one being garbage collection,
and the other being unchecked deallocation. We will have a good bit to
say about both of these in this chapter.
A SIMPLE LINKED LIST
Example program ------> e_c25_p1.ada
The program named e_c25_p1.ada contains all of the logic needed to generate
and traverse a linked list. We will go through it in detail to illustrate
how to build and use a linked list.
The first thing we need for a linked list is a record type containing
an access variable which accesses itself. Line 9 is an incomplete
record definition which will allow us to define the access type
in line 11. After we have the access type defined, we can complete
the record definition in lines 13 through 17 which includes a reference
to the access type. The record type therefore contains a
reference to itself. Line 9 is more properly called a type specification
and lines 13 through 17 a type body. Note that the incomplete type definition
can only be used to declare an access type.
We declare two additional access variables in lines 19 and 20, and two
procedures to be used to generate and traverse the list as we will see
shortly. Note that all of this is contained within the declaration part
of the main program.
The program itself, beginning in line 56, begins with a for loop
covering the range of the string variable named Data_String, defined
earlier, and each character of this string is given in turn to the procedure
Store_Character. It remains for us to discover what this procedure
does.
THE PROCEDURE Store_Character
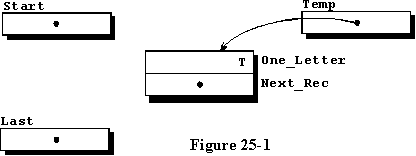 We
enter this procedure with the single character and wish to store it away
somehow for later use. We use a local variable, named Temp, which
is an access variable to our record type and use it to dynamically allocate
storage for a variable of the record type CHAR_REC in line 42, then
assign the single character input from the calling program to its field
named One_Letter. The field of this record named Next_Rec
is an access type variable, and according to the definition of Ada, the
system will set it to null when it is generated. Figure 25-1 is
a graphical representation of the record variable, the two access type
variables defined in lines 19 and 20, named Start and Last,
and the local access variable named Temp. Now we need to insert
the new record into our linked list, but there is a different way to do
it depending on whether it is the first record, or an additional record.
THE FIRST RECORD
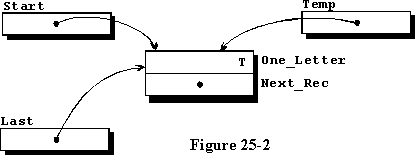
If it is the first record, or if this is the first time this procedure
has been called, the value of the access variable Start will be
null, because the system assigned a value of null to it when
it was elaborated. We can test the value, and if it is null, we
assign the value of the new record's access variable to the access variable
Start and to Last. We have generated data that could be graphically
depicted by figure 25-2, and we will see shortly just how this will be
used.
AN ADDITIONAL RECORD
If we find that the value of Start is not null, indicating
that it has already been assigned to access another record, we need to
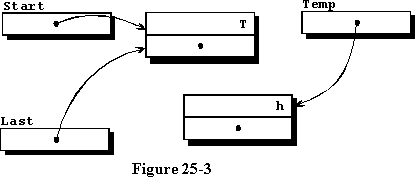
add the new record to the end of the list. If it is the second time we
have entered this procedure, we have data as pictured in figure 25-3, which
includes the single record entered earlier, and the new record which is
still disassociated with the first but accessed by the access variable
named Temp.
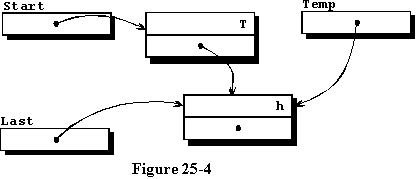
We add the new record to the end of the list in lines 50 and 51, with
the resulting list being pictured graphically in figure 25-4. Line 50 causes
the access variable in the first record to access the new record, and line
51 causes the variable Last to refer to the new record which is
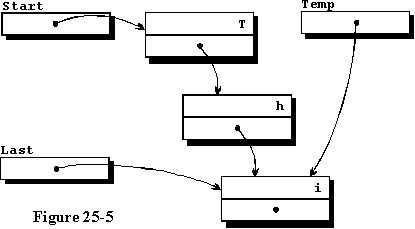
now the end of the list. After entering the third element and adding it
to the end of the list, we have the data structure pictured in figure 25-5.
Further elements will not be diagrammed for this example, but it would
be good for the student to draw a few additional diagrams.
TRAVERSING THE LIST
Each time a character is added to the list, the Traverse_List
procedure is called which starts at the input access point, Start in
this program, and lists all characters currently in the list. It does this
through use of its own local access variable named Temp which is
initially assigned the address of the first record in the list. It checks
first to see if the list is empty, and if it is not, it enters a loop where
it outputs the character in each record until it finds a record with a
value of null in its access variable field named Next_Rec,
which is an access pointer. The variable Temp is used to work its
way through the list by the assignment in line 32 where Temp is
assigned the access variable's value from the next record each time through
the loop.
Since the list is traversed each time a character is entered into the
list, the list of characters output will grow by one character each time
a character is added and the updated list is traversed.
We traverse the list one more time in line 65, then we free the entire
list one element at a time. You will notice that we do not actually deallocate
the free'ed elements, we only assign the access variables the value of
null. We will depend on the garbage collector to do the deallocation
for us.
MORE ABOUT GARBAGE COLLECTION
We mentioned garbage collection in chapter 13 of this tutorial, but
there is more to be discussed about this subject. An Ada compiler may include
a garbage collection facility which will search through the access variables
and the storage pool occasionally to see if there are any locations in
the storage pool that are not accessed by access variables. If it finds
any, it will return those locations to the free list so they will be available
for allocation again. In this way, any memory that gets lost, either through
faulty programming, or due to intentionally clearing an access variable,
will be automatically restored and available for reuse as dynamic variables.
Note however, that implementation of a garbage collector is optional in
an Ada compiler. Check your documentation to see if a garbage collector
is actually available with your compiler.
USING THE GARBAGE COLLECTOR
In lines 68 through 73, we execute a loop that will traverse the linked
list, and assign all of the access variables the value of null.
If there is a garbage collector, it will eventually find the locations
in the storage pool that no longer have an access variable accessing them
and return those locations to the available pool of usable memory. We used
the word eventually because there is no predefined time when this will
occur, but is at the discretion of the compiler writer. More will be said
about this topic later in this chapter.
If your compiler does not have a garbage collector, the operating system
will reclaim the lost memory when you complete execution of the program,
so no memory will actually be lost.
WHAT IF THE DYNAMIC ALLOCATION FAILS?
As mentioned earlier in this tutorial, if there is not enough memory
to provide the requested block of memory, the exception Storage_Error
is raised. It is then up to you to handle the exception, and provide a
graceful way to deal with this problem. You may want to suggest a means
of recovery to the user.
Compile and Execute this program, observe the output, and then return
to additional study if you do not completely understand its operation.
You will need a good grasp of this program in order to understand the next
program, so when you are ready, we will go on to a linked list that is
a bit more complicated because it can be used to sort an array of characters
alphabetically.
A LINKED LIST THAT SORTS ALPHABETICALLY
Example program ------> e_c25_p2.ada
The next example program, named e_c25_p2.ada, uses a different storage
technique that results in an alphabetically sorted list. This program is
identical to the last except for the Store_Character procedure.
In this program, the Store_Character procedure works just like
the last one if it is the first character input as you can see by inspecting
lines 74 through 77. If it is an additional input however, we make a call
to the embedded procedure named Locate_And_Store. This procedure
searches through the existing list looking for the first character in the
list that is not less than the new character alphabetically. When it is
found, the search is terminated and the new character must be inserted
into the list prior to the located character. This is done by moving access
variables around rather than by moving actual variables around. If the
new character must be added to the starting point of the list, it must
be handled in a special way, and if it must be the last element, it also
requires special handling.
ADDING ELEMENTS TO THE LIST
Figure 25-6 illustrates the condition of the data when the fourth element
is to be added to a three element list.
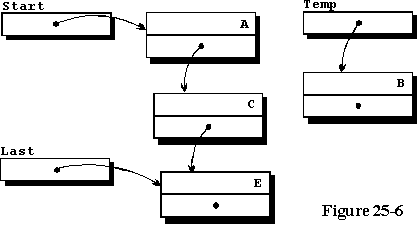
The three element list is identical to the list described in the last
example program and Temp is accessing the new element to be inserted
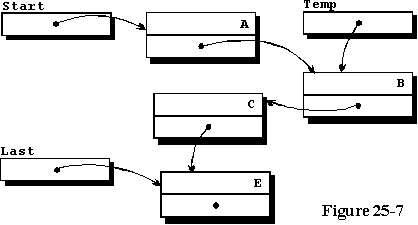
alphabetically. Lines 64 and 65 of the program alter the access variables
to do the insertion, and figure 25-7 illustrates the result of changing
the access variables to achieve that goal. Note that the character data
used here is not the same as the data used in the program, but is different
for illustrative purposes. The cases where the new record is added to the
beginning of the list, and when it is added to the end of the list will
not be illustrated graphically, but is left for the student to diagram.
MORE ABOUT Unchecked_Deallocation
In chapter 13, we first mentioned the generic procedure supplied with
your compiler named Unchecked_Deallocation and illustrated how to
use it in example programs there. Since it can be used with any dynamically
allocated data, it can be used with these programs also. In order to use
it, you must first mention the name in a with clause as is done
in line 2 of this program to make it available. Because it is a generic
procedure, it must be instantiated before use. Line 22 is the instantiation
of the procedure where it is named Free. Pascal and C each have
a deallocator available named Free, and the name Free has
become fairly standard in Ada because of the other languages. You would
be encouraged to use the name Free also for ease of communication
with other Ada programmers. It would be perfectly legal to name it any
other name provided it obeyed the rules of naming an identifier.
HOW DO YOU USE Unchecked_Deallocation
When you use the Unchecked_Deallocation procedure, you are essentially
taking on the responsibility for managing the storage pool yourself, and
you must tell the system that you will be responsible for garbage collection,
and that it need not concern itself with it. You do this by using the pragma
named CONTROLLED as illustrated in line 25. This tells the system
that you will be responsible for managing all areas of the storage pool
that are dynamically allocated to any access variable of type CHAR_REC_POINT.
The system will not attempt to do any garbage collection for this type,
but will assume that you are handling the memory management.
You may think that it would be a good idea to let the system maintain
the storage pool and do the garbage collection automatically but this can
be a real problem, which will be evident after we understand what garbage
collection is and how it is implemented.
HOW IS GARBAGE COLLECTION IMPLEMENTED?
There is no predefined method of how often garbage collection should
be implemented, so it is up to each compiler writer to define it his own
way. One of the most common methods is to wait until the storage pool is
used up, then do a search of all access variables and all storage pool
areas to find all areas that are unreferenced. Those areas are then returned
to the free list and program execution is resumed. The biggest problem
with this is that it may take as much as a full second of execution time
to accomplish this during which time the Ada program is essentially stopped.
This is not acceptable in a real-time system because it could occur at
a very inopportune time, such as during final approach of a 747 into an
international airport. In that case, you would do well to use the pragma
named CONTROLLED to tell the system to ignore garbage collection,
and manage the storage pool yourself as we are doing in this program.
DEALLOCATING THE LIST
The loop in lines 95 through 100 will traverse the list and return all
of the allocated data to the storage pool where it will be immediately
available for reuse. The observant student will notice that the access
variable from each record is copied to the variable named Last prior
to deallocating that particular record.
Compile and execute this program, so you can see that it really does
sort the input characters alphabetically. It should be apparent to you
that this very simple case of sorting single characters is not really too
useful in the real world, but sorting a large list of records containing
23 fields, by last name, first name, zipcode, and place of birth, could
be a rather large undertaking, but could also lead to a very useful program.
Remember that in this program we are only changing access variables rather
than moving the data around, so the efficiency of this technique when using
it for a large data base will be very good.
A BINARY TREE SORTING PROGRAM
Example program ------> e_c25_p3.ada
The example file named e_c25_p3.ada illustrates the use of dynamic allocation
and recursion to perform a sorting function. It uses a binary tree method
of alphabetization, which is thoroughly defined in Wirth's book, "Algorithms
+ data structures = Programs". The method will be briefly defined here.
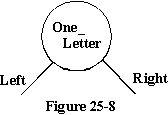 The
sorting element is pictured in figure 25-8, where a node is composed of
the stored data within the circle and the two pointers, each of which point
to other nodes or to null values. Each of these nodes must have
something pointing to it to make the entire system useful, and we need
a few additional pointers to find our directions through the final overall
structure.
The definition of the node is contained in the program in lines 14 through
19, where we define the type of the node with 2 access variables pointing
to it's own type. You will see that we have one access variable named Left
and another named Right which correspond to the two legs out
of the bottom of the node in figure 25-8. The node itself contains the
data which could be any number of different variables including arrays
and records, but for our purposes of illustration, will contain only a
single character.
BUILDING THE TREE
The main program begins in line 74 with a loop to call the procedure
Store_Character once with each character in the input string named
Data_String. We traverse the list one more time in line 82, and
assign the root the value of null. The following description of
operation will use Test_String as the string example. The first
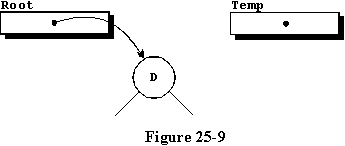
time we call Store_Character, with the character "D", we allocate
a new record, store the "D" in it, and since Root is equal to null,
we execute line 65 to assign the access variable named Root to point
to the new record, resulting in the state found in figure 25-9.
 The
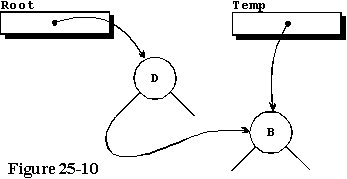
next time we call Store_Character, this time with the character
"B", we allocate a new record, store the "B" in it, and since Root is
no longer equal to null, we call the procedure Locate_And_Store
from line 67, telling it to start at Root. The procedure Locate_And_Store
is recursive, calling itself successively until it successfully stores
the character. The first time it is called, the input character is less
than the stored character at the input node, which is "D", so the left
branch is chosen, and the statement in lines 45 through 49 is executed.
In this particular case, the left branch is null, so it is assigned
the address of the input record resulting in the state found in figure
25-10. The tree is beginning to take shape.
THE THIRD CHARACTER
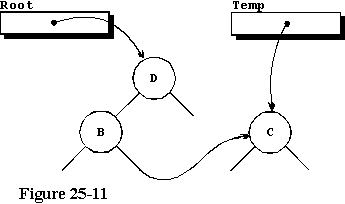
The next character is sent to Store_Character, this time a "C",
resulting in another call to Locate_And_Store. On this pass through
the logic, because the input character is less than the character at the
root node, we select the left branch and call Locate_And_Store recursively
from line 48. On this recursive call, we tell it to work with the node
stored at the left branch of the present node. In the next procedure call,
we find that "C" is not less than the "B" stored there and we find that
the right branch of this node is null, so we can store the new node
there. Our tree now looks like that given in figure 25-11.
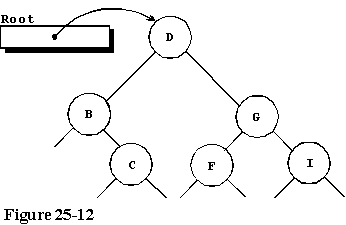
Continuing through the remaining characters of our input stream, we
finally have the structure as pictured in figure 25-12 with all 6 characters
stored in it.
TRAVERSING THE B-TREE
Traversing the tree is essentially the same as building it, except that
we do not need to test for equality of the input data, only test each node's
Left and Right access values. If the access values are not
equal to null, there is a subtree where the access variable is pointing,
and we recurse to that subtree and check each of its subtrees. With a bit
of study, you should be able to trace your way through the tree to see
that we actually do alphabetize the input characters by the way we built
the tree, then traverse it for output.
DEALLOCATING THE TREE
Once again we use Unchecked_Deallocation and the pragma CONTROLLED
to explicitly deallocate the tree. We do this by traversing the tree
in a manner similar to when we printed the characters out. One important
thing to keep in mind however is that you must free a node only after you
have checked both subtrees, because once you free a node, its subtrees
are no longer available.
PROGRAMMING EXERCISES
-
Use Unchecked_Deallocation to deallocate the list in the example
program e_c25_p1.ada.(Solution)
-
Add a variable of type INTEGER named Character_Count to the
record named B_TREE_NODE in e_c25_p3.ada. Store the current character
count in this variable as the tree is generated. When the string is completed,
output the sorted character list along with the position in the string
it occupies.(Solution)
     B is character 2 in the string.
     C is character 3 in the string.
     D is character 1 in the string.
     F is character 6 in the string.
     G is character 4 in the string.
     I is character 5 in the string.
Advance to Chapter 26
Return to the Table of Contents
Copyright © 1988-1998 Coronado Enterprises
- Last update, February 1, 1998
Gordon Dodrill - dodrill@swcp.com - Please
email any comments or suggestions.
 We
enter this procedure with the single character and wish to store it away
somehow for later use. We use a local variable, named Temp, which
is an access variable to our record type and use it to dynamically allocate
storage for a variable of the record type CHAR_REC in line 42, then
assign the single character input from the calling program to its field
named One_Letter. The field of this record named Next_Rec
is an access type variable, and according to the definition of Ada, the
system will set it to null when it is generated. Figure 25-1 is
a graphical representation of the record variable, the two access type
variables defined in lines 19 and 20, named Start and Last,
and the local access variable named Temp. Now we need to insert
the new record into our linked list, but there is a different way to do
it depending on whether it is the first record, or an additional record.


 The
sorting element is pictured in figure 25-8, where a node is composed of
the stored data within the circle and the two pointers, each of which point
to other nodes or to null values. Each of these nodes must have
something pointing to it to make the entire system useful, and we need
a few additional pointers to find our directions through the final overall
structure.
 The
next time we call Store_Character, this time with the character
"B", we allocate a new record, store the "B" in it, and since Root is
no longer equal to null, we call the procedure Locate_And_Store
from line 67, telling it to start at Root. The procedure Locate_And_Store
is recursive, calling itself successively until it successfully stores
the character. The first time it is called, the input character is less
than the stored character at the input node, which is "D", so the left
branch is chosen, and the statement in lines 45 through 49 is executed.
In this particular case, the left branch is null, so it is assigned
the address of the input record resulting in the state found in figure
25-10. The tree is beginning to take shape.


